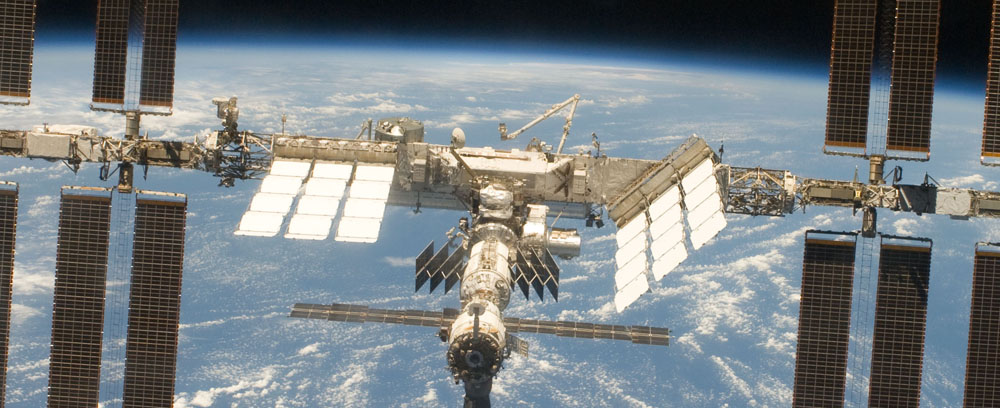
Building the International Space Station involved thousands of measurements. They were all crucial to the integrity of the station . Measurements are also vital to the operation of the station.
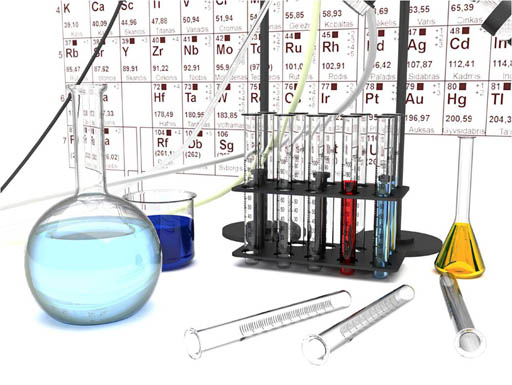
In this experiment you will be looking at some of the measuring tools in your kit. Specifically, these are the metric ruler, thermometer, graduated cylinders, and digital balance. These measure length, temperature, volume, and mass (weight) respectively. These tools let you find and communicate accurate facts about items. A lot can be learned from these simple measurements.

This objective means you try to get the most out of the tools mentioned above by being as accurate as possible. The words, "significant figures" (also called significant digits), mean being clear about its accuracy; neither underestimating or overestimating the accuracy. The words, "and units", means don't forget to include the unit of measurement (its dimension). In math classes, you normally deal with abstract numbers like "5, 3, and 7.5"; however, chemistry deals with measurements, so "5, 3, and 7.5" are not good enough. Writing "7.5" instead of "7.5 cm" is wrong because "cm" is just as important as "7.5".

The metric system is one of the greatest inventions of mankind. Without a system that allows everyone to find agreement on measurements such as distance, mass, and volume, the advances in technology including modern manufacturing and trade would have been impossible. King Louis XVI of France was the one who ordered this new system in 1790. Seeing the beauty in its simplicity and ease of standardizing measurements, he declared "Metrics is for all people for all time." Metrics is based on the Earth, water, and the fact we have 10 fingers. Even George Washington and Thomas Jefferson begged the Congress to adopt a system just like the metric system. Unfortunately, Congress procrastinated, and we would were stuck with the English system.
Metrics is covered in one of the lecture tutorials. You can visit it by following this link:
www.chemistryland.com/CHM130S.../Metrics.html

Learning a few tricks on finding an object's volume.
In chemistry as in many fields, you will frequently be measuring something and be using a variety of measuring tools. These tools could be a simple metric ruler or a complicated electronic pH meter.
Chemistry Applications: Measuring the mass of chemicals using digital and analog balances. Measuring smalls volumes using 1 microliter (a millionth of a meter) micropipettes or measuring larger one liter volumes using a large graduated cylinder or volumetric flask. Measuring temperatures using a variety of digital and analog thermometers that are based on different technologies.
General Applications: Nearly every discipline involves making measurements. Measurements are only as good as the measuring tool and the person's skill at using that measuring tool.
A person may know which measuring tool is the most appropriate tool to use and know how to set up the tool to take measurements, but that person must also know how to read and record those measurements correctly. For example, a person may know that an analytical balance is the right choice for weighing items under half a pound. That person may also know the proper way to zero the balance and to prevent fluctuations in the mass by using the balance's wind blocking cover. However, if the balance reads "125.0000 grams" and the person only writes down "125 grams", then the person did not record the the measurement correctly. In other words, a $2,000 balance was treated like a $10 balance as far as recording accuracy was concerned.
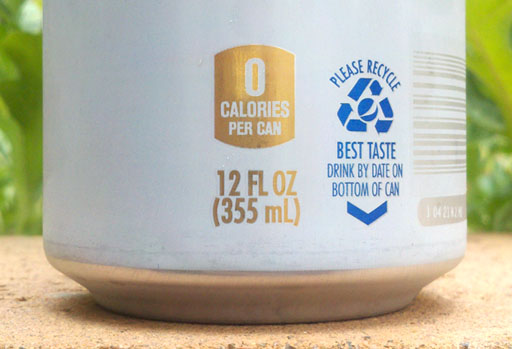
Americans really need to think in metrics rather than in English units. The rest of the world plus nearly all scientific disciplines in the USA have changed to the Metric system. So when you pick up an item that shows mass or volume, get in the habit of looking at both the metric and English units on the label. For example, a 12 ounce can of soda is listed as 355 mL (milliliters). The advantage of milliliters is that water weighs essentially 1 gram per milliliter. So this can of diet soda weighs around 355 grams. If you only looked at 12 fluid ounces, the mass of the can would not be easy to figure out.
Determining volume is useful for every day items such as gas tanks, swimming pools, drinks, and recipes. Also, volume is required before one can find density or concentration.
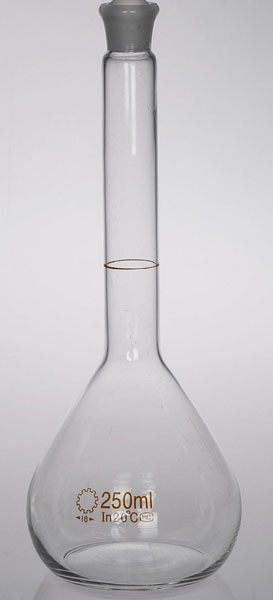
Graduated Cylinders, Volumetric Flasks, Pipettes, and Burets

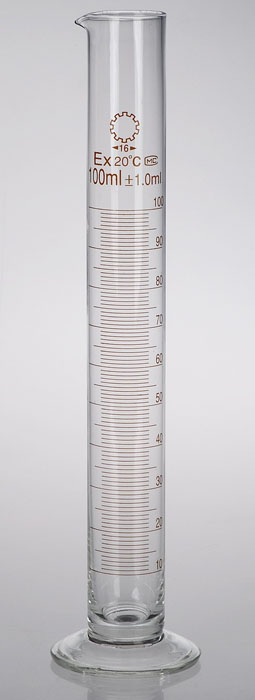
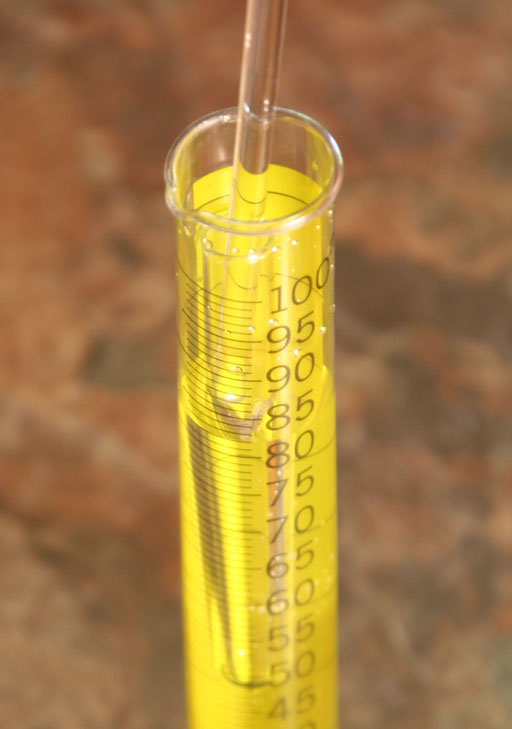
Water has a tendency to creep up the inside wall of the graduated cylinder. So the water surface isn't flat. It will be bowed. They call this curved surface the meniscus from the Greek word meniskos meaning "crescent" like the crescent of the moon. The bottom of the curve is where you read the water's volume. In the upper-right closeup image, the bottom of the meniscus is between 20.6 and 20.8 mL (The divisions here are 0.2 mL apart.) When you have your eye at the correct level, the lines on the graduated cylinder will look horizontal rather than curved. Notice the lines on the close-up image are horizontal. That means you have your eyes level with that area of the graduated cylinder.

Liquid and Digital Thermometers

The digital thermometers are now popular. There are also many variations of these.
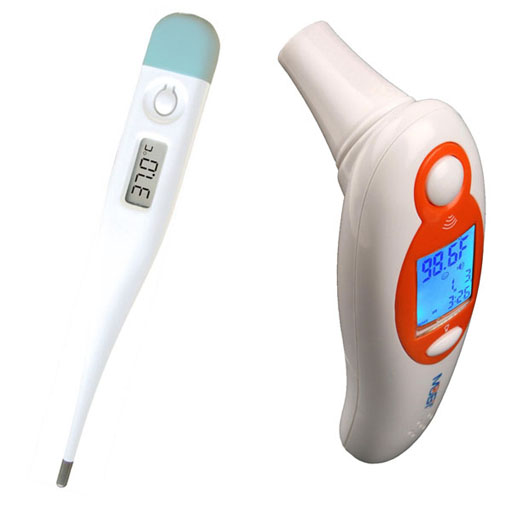
The science behind the left thermometer is that contains a thermistor, which is an electrical resistor that changes its resistance at different temperatures. As the temperature goes up, the electrical resistance comes down and that is converted to a temperature reading on the display.
The ear thermometer doesn't contact the ear drum, so it is measuring the amount of infrared light emitting from the ear. The detector is an array of small thermocouples. A thermocouple is two different metals sandwiched together. A thermocouple is used by your gas water heater or gas oven to sense if the pilot light is on. It's also used for the thermostat of your air conditioning. These infrared detectors use an array of very small thermocouples (called a thermopile). As they are exposed to heat, they generate an electrical voltage, which can be converted to a reading on the display window.
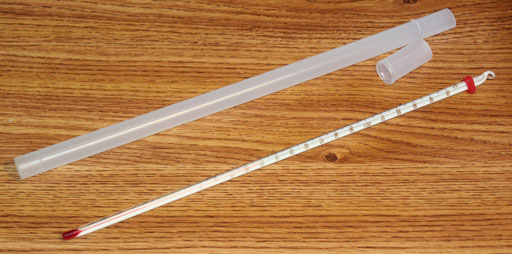
Your kit has an 12 inch glass alcohol-filled thermometer in a white plastic case. They call these alcohol-filled, but the liquid might be a mixture of liquids and not just alcohol. Your thermometer has markings for every degree Celsius. The cap on the case snaps on and off.
Be aware that some thermometers are made to be totally immersed in the liquid they are measuring temperature. These often have a loop on top so they can be hung by a string while immersed in the liquid. The ones put into aquariums are often the total immersion type thermometers. Their readings are only accurate if totally immersed. The one in your kit is not that type despite the fact that it has a loop. Just immerse the bulb end where the liquid is.
Reading devices that use a graduated scale and knowing significant figures
Liquid thermometers, graduated cylinders, and rulers have something in common. They all use markings to indicate the whole units of measurements and fractions of that measurement.
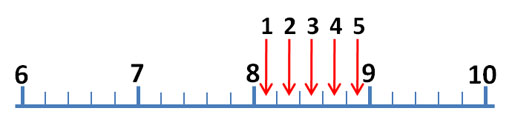
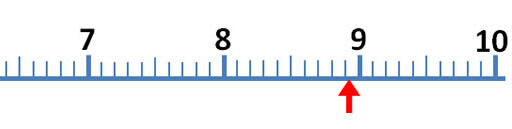
The mark just before the red arrow is 9/10ths of the distance between 8 and 9. So that mark is 9/10th of 1, which is 0.9. The arrow is close to 8.9, but don't report it as 8.9 milliliters. To get a more accurate reading of this measurement, try to visualize 10 steps between the 8.9 and 9.0. The easiest one to visualize would be 5 steps (5/10) or halfway between 8.9 and 9.0 For example, if the red arrow was halfway between 8.9 and 9.0, we would report the answer as 8.95 milliliters, but the red arrow is less than halfway.
So the first two digits (8.9) are measured without any estimation. They make 2 significant figures (also called significant digits). The last digit is an educated estimate, but it does give us more accuracy. So that gives us a third significant figure. In other words, you want to squeeze a little more accuracy from these devices than just what the markings tell you. Again, you do that by estimating between the marks.

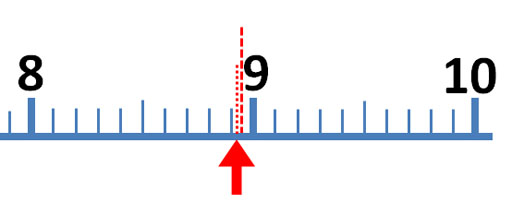
Roll cursor over the image to see these visualized lines. If the arrow is just to the right of the 0.75 line, then call the measurement 8.8. If farther to the right, you could estimate 8.9 If it is just to the left of the 0.75 line, call the measurement 8.7. If farther left and closer to 8.5, then call it 8.6. If the arrow is aligned with the 0.75 line, report it as 8.7 or 8.8. I'd call the arrow 8.8. Remember, these kind of markings could be on a thermometer, ruler, graduated cylinder or any measuring device, but the rules for finding the most accurate measurement is the same.


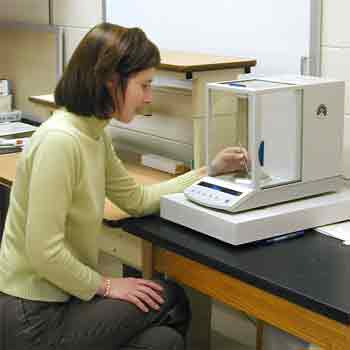
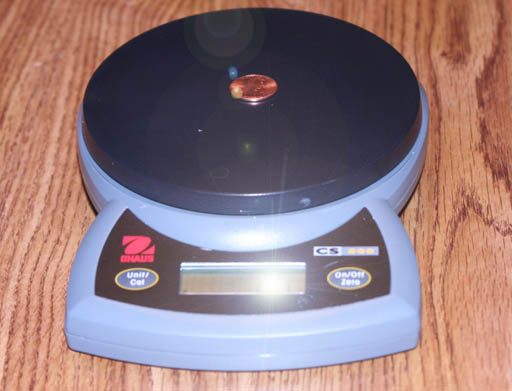
Analytical Balances and other digital balances
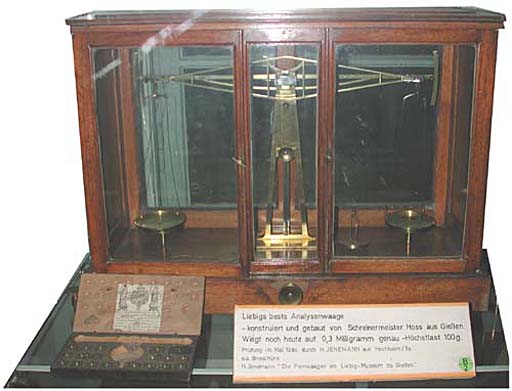

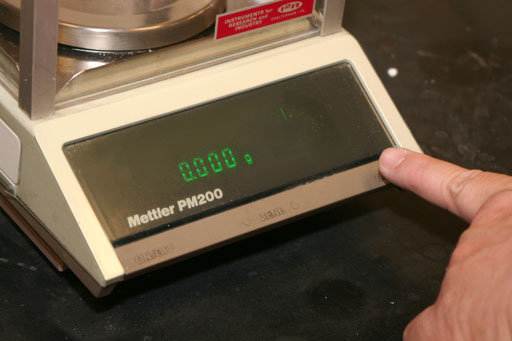
Modern digital balances make weighing very easy. There's just one pan to place the item on. You don't need to have a box of known masses to balance out the weight of your unknown. The balancing is done automatically and internally. Plus readout is directly in grams with 3 or 4 decimal places. Also, a modern analytical balance is so sensitive that it comes with an enclosure to block any air currents. So you have to open a door or lid to place the object onto the weighing pan (also called balance pan).
Analytical balances in most labs are capable of measuring to one thousandth of a gram or smaller. Let's say the digital display says "14.300". It would be a mistake to write that down as 14.3 grams because the analytical balance actually measured its mass to the nearest thousandth of a gram giving us 5 significant digits of accuracy. A $15 balance can measure 14.3grams, but it takes a $2,000 balance to measure 14.300grams. Going from 14.3g (3 significant digits) to 14.300g (5 significant figures) is increasing the accuracy 100 fold so don't drop these zeros.
A tutorial on significant figures is in the lecture at this address: (click browser's back arrow button to return here)
www.chemistryland.com/CHM130S/...SignificantNumbers.html
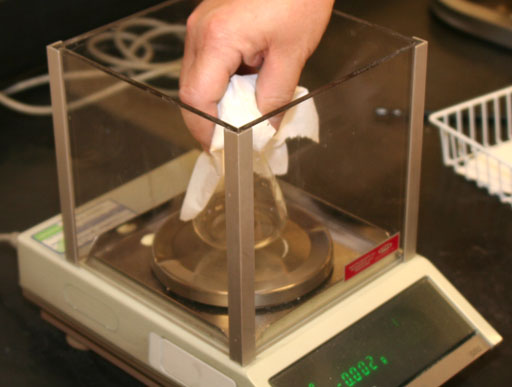
Before placing an object onto the weighing pan, "tare" the balance by pressing the TARE button. Some balances use the symbol "O/T" (meaning zero or tare).
The word "tare" is from Arabic "tarah" meaning to throw away. In essence by pressing the tare button, we are telling the balance to throw away any weight on the balance so we get a zero starting point.
Roll cursor over image on the right to see the other balance.
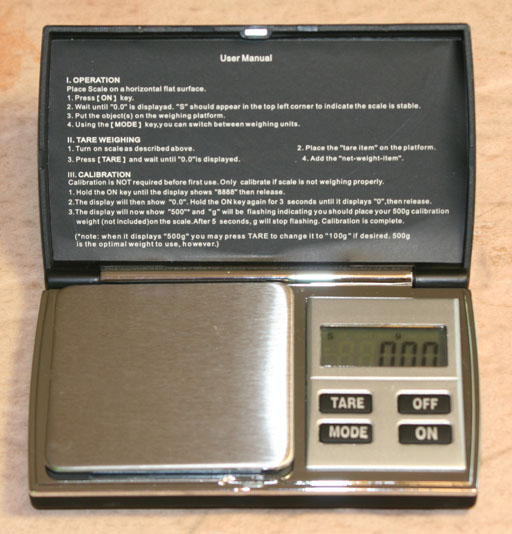
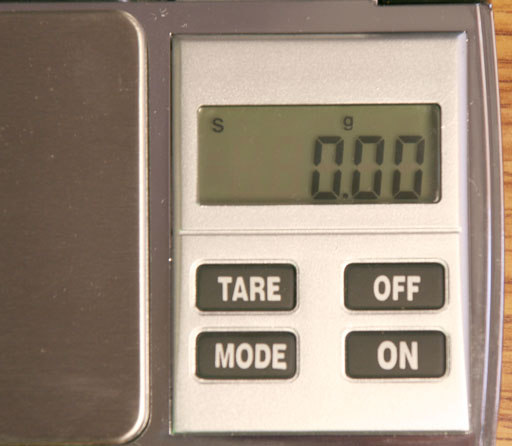
The portable digital balance in your kit has an accuracy of one hundredth of a gram, so it's not as sensitive to air currents, which is why there is no built-in enclosure. Since it runs off of batteries, you must turn it on first with the ON button. Wait for the "S" indicator shown on the LCD screen to indicate that the balance is stable. Then press the TARE button to set the reading to zero (if it's not reading zero).
These portable balances measure in other units besides grams. They can weigh out in the following units:
- Avoirdupois ounces (the kind where 16 ounces make a pound). The U.S. Post Office uses these ounces to charge mailing fees. This is also what you see listed on food items.
- Troy ounces (the standard for weighing and selling gold, platinum, or silver)
- Grains (used in weighing black powder for making ammunition)
- Drams (an old English measurement for weighing medicines equal to 1/16 of an oz)
- Carats (used to measure diamonds and other gems).
- Grams (used for mass in the Metric system)
For all balances...
DO NOT weigh chemicals directly on the weighing pan (use paper, weighing boat, or some kind of container). The chemicals can corrode the weighing pan or fall off and get behind buttons or other mechanisms.
DO NOT place hot objects on the weighing pan.
These are common sense type of warnings. Weighing paper not only protects the pan from corrosive chemicals, it also makes it easier to pick up the powder after it is weighed.
Weighing paper has a smooth finish so that powder doesn't stick to it. Regular paper will work but not as well because it doesn't have as smooth a finish as laboratory weighing paper. Aluminum foil can also be used for chemicals that don't react with aluminum.
A weighing boat is similar to weighing paper except it has a lip around it to keep powder from spilling off the edge.
There are two reasons not to put hot objects on the balance pan. First, a hot item can damage the pan. Second, the air around the hot item warms up and then gets pushed up by the cooler room air. This causes air currents around the balance pan, which causes the readout to fluctuate. Even extra warm items will cause the electronics in the digital balance in your kit to read low.

If the meter stick is placed at a right angle, one can define a square that would be one square meter. This unit of area can replace the other ways of measuring areas such as square miles, square yards, and acres. You have heard the word "acre" but probably had no idea what the dimensions are. It's 208.7 feet by 208.7 feet. So that's why it's hard to remember the size.

Using the meter to make a cube gives us a way to measure volume. This lets us get rid of all of these forms of volume measurements plus a dozen more not mentioned, such as drams, pecks, quarts, pints, fluid ounces, gallons, imperial gallons, and the list goes on.
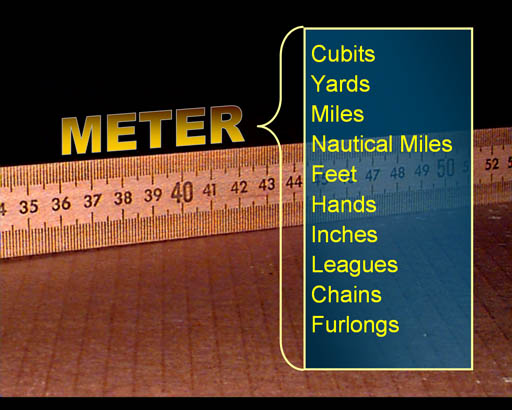
In other words, using a meter to define distance, area, and volume can eliminate the confusion of about 100 other English units of measurement most of which we have no idea what they mean.

A cubic meter is a pretty large volume. Most things we buy aren't that large. How can we create a volume that is more convenient? In the metric system, we size things either 10 times larger or 10 times smaller. So let's divide the meter by 10. That is called a decimeter because deci means one tenth. Now if you make a cube that has a height, width, and depth of one decimeter, you create a cubic decimeter. That is a more convenient size, which is a little larger than a quart. Since this is a size we will use a lot, let's give the cubic decimeter a shorter name. The French called it Liter after the word, Litron, an older measure for capacity.
In the English system, we have a barrel and a quart, one being a large volume and one being smaller. However, there is no easy conversion between the two. In Metrics, there are one thousand liters in a cubic meter.

Now let us say we want a volume that is even smaller than the liter (cubic decimeter). Like before, we just make it 10 times smaller. So here we have zoomed in on the previous cubic decimeter. To make a smaller volume we just divide a decimeter by 10. That gives us a centimeter which means it is 1/100 of a meter. To make a cubic centimeter, we just make a cube that measures one centimeter on each side.
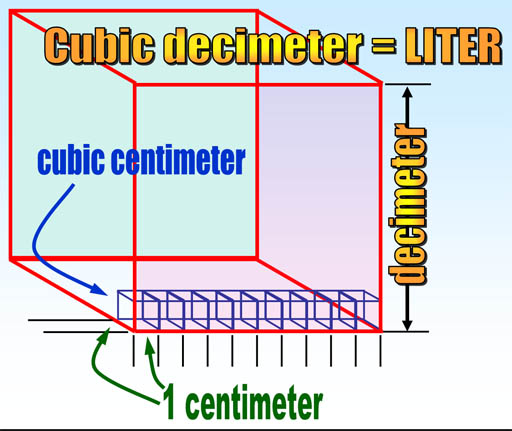

Remember that a cubic decimeter is the same as a liter? The cubic centimeter that we make here is one thousandth (1/1000) the size of a cubic decimeter, and also one thousandth the size of a liter. In metrics, the prefix that means one thousandth is "milli". So a milliliter is the same size as a cubic centimeter. In medical professions they often call a cubic centimeter simply "cc" and several cubic centimeters as cc's. The milliliter is an alternative name and more commonly used in chemistry.
If a cubic centimeter (milliliter) was filled with something, that could make a standardized weight. The Metric System wants items that are readily available to everyone. The Earth was the first one and fingers (decimals) the second. Dan Fahrenheit and Anders Celsius had already used water to standardize a way to measure temperature. So water combined with the meter was going to standardize weight. The weight of water that fills a cubic centimeter (milliliter) was to be the standard for weight and it was called a gram, a Latin word meaning "a small weight."
Since it takes 1,000 cubic centimeters to make a cubic decimeter (a liter), a liter of water weighs one thousand grams. The prefix "kilo" means one thousand, so a liter of water weighs one kilogram. A kilogram was easier to measure more accurately than a gram, so it became the standard for measurement.
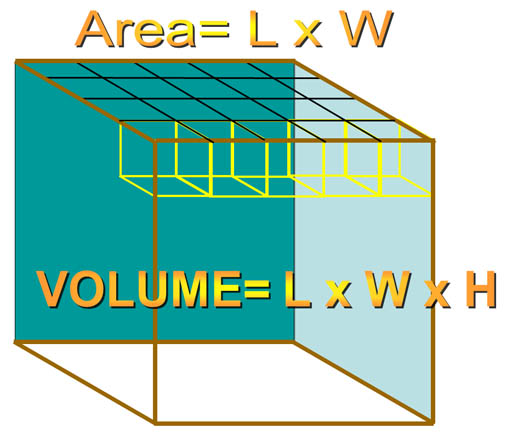
A. Rectangular objects.
For a rectangular object, when you multiply by length (L) and width (W), you get the area of the top (or bottom) of the object. For example, here we have a length and width of 5 and 4 centimeters, which gives us the area of 20 square centimeters (cm2). If the height was one centimeter, each of those square centimeters are considered cubic centimeters giving us a volume of 20 cubic centimeters (cm3 or cc). If the height were 4 centimeters, then there would be 4 layers of 20 cm3 each. So by multiplying by the height, we get the total number of cubic centimeters of 80 cm3.

V=πr²H
B. Cylindrical objects.
For cylindrical objects, the formula for the volume is V=pi x radius squared x height (V=πr²H). πr² is the area of a circle. Multiplying area of the circular top (or bottom) by height (H) gives you the volume of a cylinder.
For example, these beakers have no markings to show their volume. You could measure across the base to find the diameter. Divide the diameter by 2 to get radius. You would then measure the height of the beakers up to their spout. If your measurements are all in centimeters, then your answer will be in cubic centimeters (milliliters).
C. Spherical objects.
The formula for the volume of a sphere is V=4/3πr³.
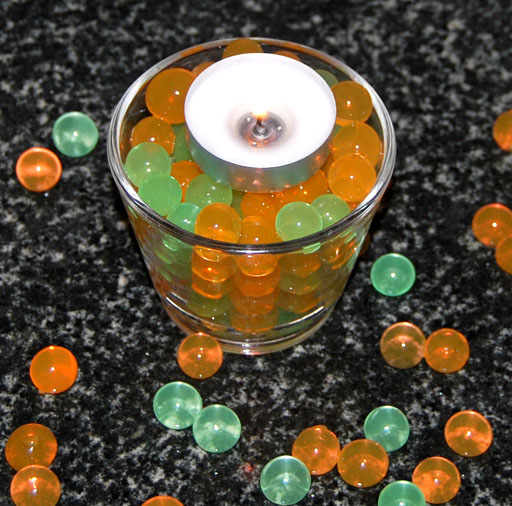
These beads are made of sodium polyacrylate (a polymer), which absorbs about 300 times its own weight in water. They started out as tiny beads when dry but then grew much larger when soaked in water. The same material is used in diapers to keep the baby dry.
To get radius, it's usually easier to measure diameter and then divide by 2.
D. Conical objects.
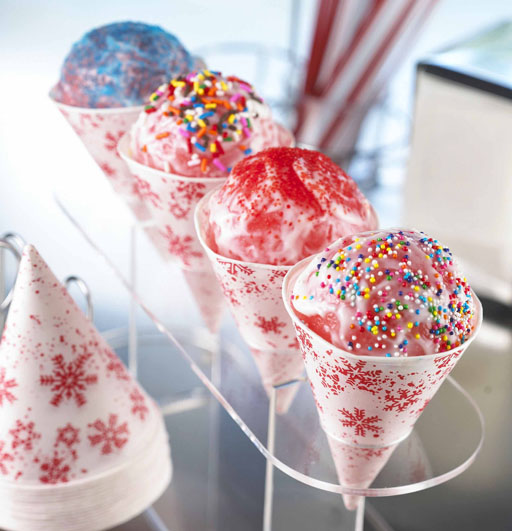
The formula for the volume of a cone is V=1/3πr²H.
To find the volume of these snow cones, you would measure the height of the paper cone and the radius of the top of the cone. Then use the above formula. To find the volume of the snowcone that rises above the top of the paper cone, you would use the radius with the sphere formula. Then divide the sphere volume by 2. Or you could just eat the cone and not have any volume left to measure.

E. Irregularly-shaped objects.
You can't use geometry to find the volume of an irregularly shaped objects (like a key). The trick to doing this was discovered by Greek scientist Archimedes over 2,000 years ago. He realized that an object submerged under water will displace a volume of water equal to the volume of the object.
For example, let's say you wanted to know if this key was really made of gold. You first have to find its volume. So first measure the volume of water in a container without the key. When the key is submerged in the water, the volume of water will increase by an amount equal to the volume of the object. So if the volume increased by 5.5 milliliters, then the key's volume is 5.5 milliliters. It's a simple concept but was quite a revelation at the time.
Rectangular Box
Your kit has 2 identical flexible plastic boxes which are holding some items. Your first task is to find the volume of one of those plastic boxes. Report the volume in cubic centimeters (cm3). The formula for the volume of a rectangular box is V=L x W x H. The ruler in the kit (image below) has markings between the labeled centimeter marks that break up that distance into 10 spaces (10 intervals). So those would be 0.1 of a centimeter (same as a millimeter). Like mentioned earlier, try to estimate the fraction between the millimeter markings. The millimeter increments are small, so you may not be able to do that. However, if the edge of the box appears to be half way between two markings, count that as 0.05 centimeters.

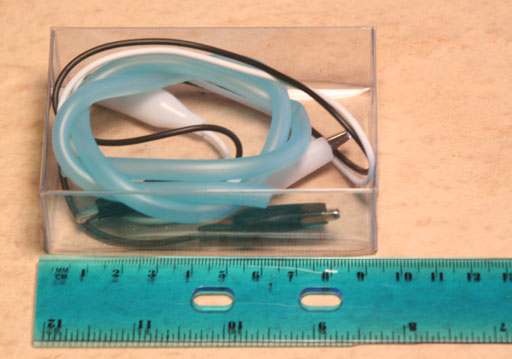
The plastic box is flexible, so the accuracy is not as good as a rigid box. Again, record length, width, and height, and report the volume in cubic centimeters and to 3 significant figures. Remember, you should have 2 digits after the decimal point if you estimate between the millimeter markings.
9.?? cm x 2.?? cm x 5.?? cm
Cylinder
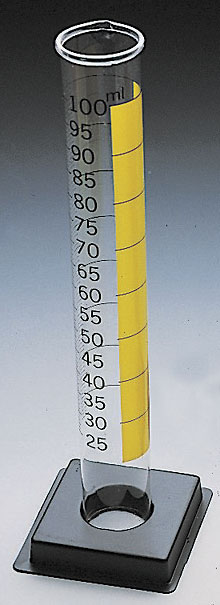
A milliliter is supposed to be the same as a cubic centimeter. One way to prove that to yourself is to find the volume of your graduated cylinder by using the formula for a cylinder (V=πr²H). To get the radius, it usually easier to measure the diameter and then divide by two. When you measure the diameter, be sure to get the inside diameter not the outside diameter.
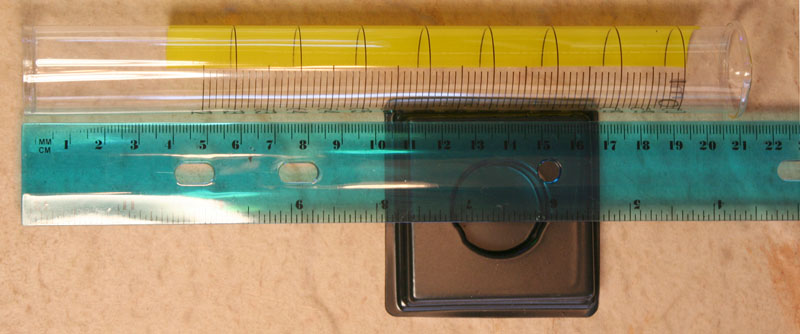
The 100mL mark is near 19 centimeters in this image.
Report the volume in cubic centimeters with 3 significant figures. Also, convert the cm3 you find to fluid ounces (to 3 significant figures) using the following conversions:
??? cm3 x 1 fluid oz = ?? fluid oz
29.57 cm3
??? cm3 x 0.03381 fluid oz = ?? fluid oz
1 cm3
Notice that the conversion fractions are set up so that a volume measured in fluid ounces is placed over an equal volume measured in cubic centimeters. In both cases the conversion cm3 is written in the denominator so that it will cancel the cm3 in the numerator. Note, 1 fluid oz=29.57 cm3 and 0.03381 fluid oz = 1 cm3. Both should give you the same answer for fluid ounces.
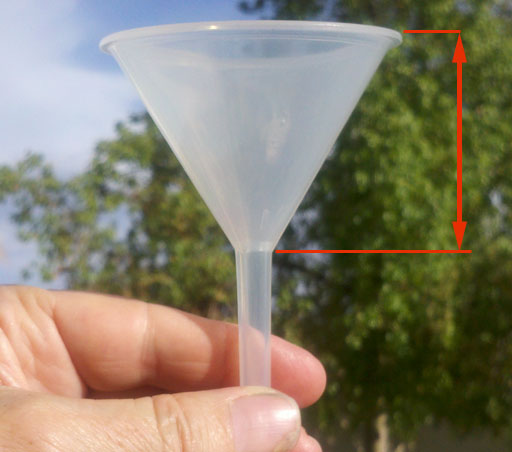
Your kit has a small funnel. Using the formula for a cone (V=1/3πr²H), find the volume of the cone portion of the funnel. Like usual, to find the radius measure the diameter and divide by two. For the height measure from the top down to where the funnel's stem begins. This isn't quite the full height of a cone, but it's close enough.
Also, instead of measuring in centimeters, measure it in millimeters. So report the radius and the height in millimeters but give the volume in cubic centimeters. See next panel for more instructions.
78.4
Notice that to go from millimeters to centimeters, we need to cancel milli and introduce centi. "milli" equals 0.001 and centi equals 0.01, so we set up fractions so that "milli" cancels and "centi" ends up on top. Notice the fractions 0.001/milli and centi/0.01 equal "1". So we are essentially multiplying by 1 so the size of 78.4 millimeters is not changing. We are simply changing the label to centimeters. You will see much more of this method as you study more chemistry. It's called label-factor method or dimensional analysis. This online lecture class has a tutorial on this method. You can get to it with this link:
www.chemistryland.com/...DimensionalAnalysis.htm
Remember that volume in the metric system comes from the length of the meter. One tenth of a meter (1 decimeter) made into a cube is called a cubic decimeter which was given the name "liter". A cubic centimeter is a thousand times smaller than a liter, so it is called a milliliter (milli=thousandths). So it's fairly easy to visualize the size of metric volumes. For example, 4 liters could be a box 1 decimeter by 1 decimeter by 4 decimeters. In centimeters that would be 10cm x 10cm x 40cm. English units of volume like pints, gallons, or teaspoons, have no easy way to know their actual dimensions. For example, a gallon is a cube 6.13579 inches on each side. There's no rhyme or reason with English units and no way to remember these English conversions.
Volume of a test tube

Volume of the glass that makes a test tube

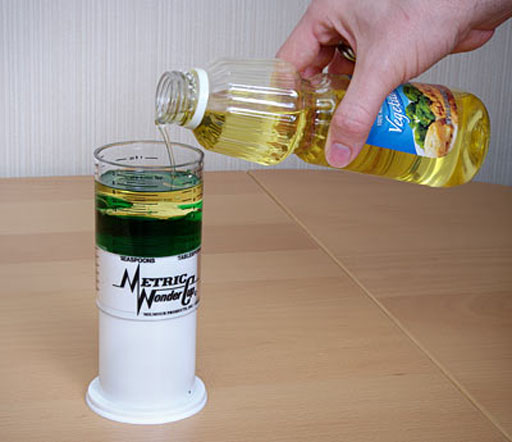
Another way to find the volume of an object is to see how much liquid (such as water) it displaces. There are some objects that will dissolve in water, so there you could use a different liquid such as vegetable oil.
Above you found the volume of the test tube, but let's now see if you can find the volume of the glass that makes a test tube. Fill your graduated cylinder to a level that is higher than the height of the test tube. Get an accurate reading of the water level (Measure to the tenth of a milliliter).
Drop the test tube into the graduated cylinder.
Use the microspatula or glass rod to push the test tube down until it fills with water. Now read the level of water again. Subtract the previous level from this new level and that's the volume of the glass used to make the test tube. If you were to determine the density of the glass, you would also get the weight of the test tube. In lab 3 you will be doing density measurements which will involve both finding the volume in a way similar to this and using the mass of the object.
Report the volume of the glass in the test tube to the nearest tenth of a milliliter.

Take a photo of the test tube being underwater in the graduated cylinder.
Also, while you have your camera ready, take a photo of yourself standing by your kit. That proves you were there doing the lab. In all labs, I will request one photo that has a picture of yourself in it doing some part of the lab. Make sure your face in showing.
This digital balance in your kit measures to 1 hundredth of a gram. That's pretty good, plus the balance doesn't cost a fortune. It also measures up to 300 grams which is about the same as the $2,000 analytical balances mentioned above.
Instructions for using the digital balance are written on the lid that covers the weighing pan and buttons.
First of all, make sure the balance sits on a hard level surface. Also, make sure the balance is measuring in grams. Look for the small "g". If not there, push the "Mode" button until it appears.

Find the average weight of a 5 pennies.
This is an interesting comparison between the accuracy of measuring 5 items separately or measuring the 5 items as a group. In general, measuring 5 items all together would be quicker and reduce the chance of error, plus reduce any accumulation of inaccuracies.
Directions:
Weigh each penny separately and record each of their masses. Now add up these masses to find a total. Now divide by 5 to get the average mass of a penny.
Would you expect the mass of each penny to be identical?
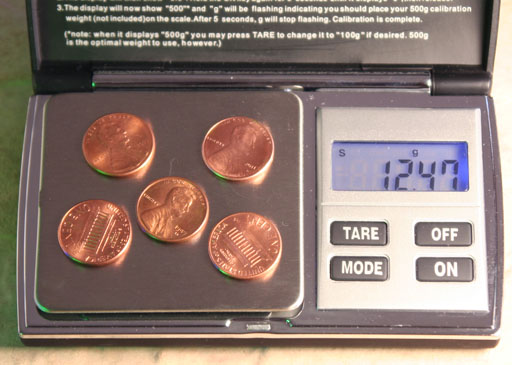
Now put all five pennies on the balance at the same time and get their total mass. This total mass should have 4 digits and therefore 4 significant figures. See how it compares to weighing them separately and adding up their masses. Divide the total mass by 5 and report the average mass of a penny to 4 significant figure because your mass measurement will have 4 significant figures.
Significant digits example: Let's say one of your pennies weighs 2.52 grams. You have 3 significant digits of accuracy. Let's say you added up the individual mass of 5 pennies and get 12.67 grams. That has 4 significant digits. You have gained some accuracy by repeating the measurements and adding up masses. To find the average, divide by 5. The accuracy of division or multiplication is only as good as the number with the least number of significant digits. 12.67 g has 4 significant digits, but "5" looks like only one significant figure. However, 5 was not a measurement. It was a count, and a count is considered exact. So your final answer will have 4 significant digits, which would be 2.534 grams (remember to write the grams).
Note: The weight of the penny has changed over the years. If you use a penny that has a date before 1982, it is 24% heavier than pennies made after 1982. So if you get one penny quite a bit heavier than the others, that might be the reason.

Your kit will have either 4 "silver" coins or 4 "gold" coins. I put "silver" and "gold" in quotes because in lab 3 you will determine if the coins are made of real silver or real gold. They are found in a small plastic jar under the goggles.
Place one of these coins on the digital balance. Record its mass in grams (a small lower case "g" should be above the decimal place. Use the "Mode" button to have the mass weighed in avoirdupois ounces (an "oz" will appear on the top of the display). Record that mass as ounces. Silver and gold coins are sold by the troy ounce. Use the Mode button to have the balance report the mass in troy ounces ("ozt" will appear at the top of the screen).
If using an analytical balance, you would have to convert grams into ounces and into troy ounces using the following factor-label method (dimensional analysis). Note: 1 ounce = 28.250 grams, and 1 troy oz = 31.103 grams.
??? grams x 1 ounce = ??? ounces
28.250 g
??? grams x 1 troy oz = ??? troy ounces
31.103 g
Notice that a troy oz in larger than the ounce we use to weigh food. Also notice that the conversion fraction is set up with grams in the denominator so that the grams will cancel with the starting grams.
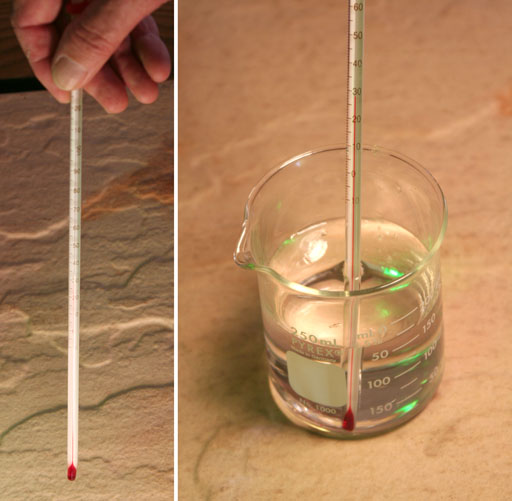
Find the thermometer in the kit. It is inside of a 12 inch white plastic tube. The thermometer measures in degrees Celsius and the markings are in 1°C increments. What is the air temperature in the room? What is the temperature of your cold tap water? What is the temperature of your hot water? (Report all three of these in Celsius to the nearest tenth of a degree as read from your thermometer and also in Fahrenheit that is calculated. Also, use the formula to get the exact conversion. Don't use my method below for estimating the conversion.)
Conversion formula of Celsius to Fahrenheit takes into consideration that Celsius counts 100 degrees from freezing to boiling of water, and Fahrenheit counts 180 steps (degrees) from freezing to boiling of water. So going from Celsius to Fahrenheit needs to increase the value by the ratio of 180/100, which reduces to 9/5. So °F=9/5°C. In other words, the temperature reading in Fahrenheit is almost twice the temperature reading in Celsius. Also, Fahrenheit doesn't start at zero for the freezing of water. It starts at 32 degrees. So we also have to add 32 degrees. So the final exact formula is °F=9/5°C + 32.
I invented an approximation of this conversion that you can do in your head. Take the degrees in Celsius and double it, then add 25. For example, the body's temperature is 37°C. Doubling that is 74. Add 25, and you get 99°F. That's pretty close because 37°C converted to Fahrenheit exactly is 98.6°F. So if you hear a temperature in Celsius, you can do this conversion in your head and get Fahrenheit.
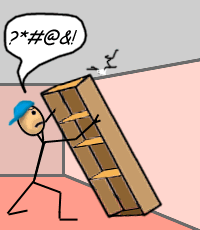
Doing measurements can make people happy or sad. Imagine telling a carpenter the height of your ceiling was 8 feet and you want a floor-to-ceiling bookshelf. He builds it based on your measurement. When installing it, he finds out that your ceiling is lower than you said. You either didn't use enough accuracy or measured it incorrectly. Either way he is cursing. You both would have been happier if you measured it correctly and reported the accuracy of your measurement.
So in future labs remember measuring is your second most important task. Safety is first. Of course, sometimes measuring incorrectly can jeopardize safety. So value these measuring skills and put them to work.
For additional instruction on measurement, visit the measurement tutorial in the lecture class:
www.chemistryland.com/.../Measuring.htm
A tutorial on significant figures is in the lecture at this address: (click browser's back arrow button to return here)
If you wish, you can copy the below summary into your email (or Word document) and type your answers after the descriptions. The required photos can either be attached to the email or inserted in the Word document if going that route. Try to keep each image under 2 megabytes. If the first letter of your last name is between A and G, send your lab reports to Loree Cantrell-Briggs at Loree.Cantrell-Briggs@phoenixcollege.edu If the first letter of your last name is between H and Z, send your lab reports to Quinn Thacker at QRT2004@yahoo.com. Be sure to title the email "Lab 1".
a.) Lab 1 Part 1: Volume by Geometry
1. Dimensions of the clear plastic rectangular box (Report in hundredths of a centimeter):
2. Volume of the clear plastic rectangular box in cm3 (Report with 3 significant figures):
b.) Lab 1 Part 2: Volume by Geometry
1. Radius of the graduated cylinder in centimeters (to the nearest hundredth of a centimeter):
2. Distance from the bottom of the graduated cylinder to the 100 mL mark in centimeters:
3. Calculated volume of the 100mL graduated cylinder (to three significant figures):
4. Convert this volume into fluid ounces using the conversion factor given in the lab instructions (report to 3 significant figures):
5. Radius of the funnel in your kit in millimeters:
6. Height of the funnel in millimeters:
7. Volume of the funnel in cubic centimeters (cm3):
c.) Lab 1 Part 3: Volume by Liquid transfer
1. Volume of the glass test tube in the kit (To the nearest hundredth of a mL):
d.) Lab 1 Part 4: Volume by Liquid displacement
1. Volume of the glass used to make the test tube (to the nearest tenth of a mL).
(Attach photo of test tube underwater in the graduated cylinder)
(Attach photo of you standing by your kit)
e.) Lab 1 Part 5: Average weight of a penny
1.
Mass of Penny #1:
Mass of Penny #2:
Mass of Penny #3:
Mass of Penny #4:
Mass of Penny #5:
2. Total of the above penny masses:
3. Average mass of one penny (to 3 significant figures):
4. Mass of all 5 pennies measured together:
5. Average mass of one penny (to 3 significant figures):
f.) Lab 1 Part 6: Mass of an ancient coin
1. Mass in grams:
2. Mass in avoirdupois ounces:
3. Mass in troy ounces:
g.) Lab 1 Part 6: Room and water temperatures
(After converting to °F, be sure to round the °F to the same number of significant figures that were read when °C was measured).
1. Inside air temperature in °C:
2. Equivalent temperature in °F:
3. Cold tap water temperature in °C:
4. Equivalent temperature in °F:
5. Hot tap water temperature in °C:
6. Equivalent temperature in °F:
Also turn in the answers to the below Post Lab questions and problems.