|
PROCEDURE FOR SMALL SCALE
PRODUCTION |
| The image below shows our strategy,
which is to use amounts that are convenient through the whole process.
For example, we start with a 1.4L (48 oz) bottle of vegetable oil. Some
fryers hold a maximum of 1.5 liters, so the 1.4 liters is the perfect size.
After the oil gets used, it can be stored back in the same bottle.
When ready for conversion, it can be mixed with a 0.25 L (12 oz) bottle
of methanol (and lye) and placed in a 2L flask. No partially empty bottles
are left over. |
|
|
 |
LOCATION TO DO CONVERSION:
We prefer to make biodiesel outside. If we spill something, it might hurt
the grass some but a nice countertop or table will not be stained.
|
 |
FIRST TIME:
When first learning about making biodiesel, it is always recommended to
begin with new (unused) cooking oil. That simplifies the process. That's
how we will start.
We will begin with a 48 fluid ounce (1.42 Liter) bottle
of vegetable cooking oil. We will use a 2 liter Erlenmeyer flask and an
electric heating element. (A link to the complete equipment list will
be at the bottom of this page) |
 |
WARM
UP OIL: Pour the oil into the flask and turn the
electric heater to low. We need to warm up the oil for a couple of reasons.
First, the heating will make the oil less viscous so it will stir more easily.
Second, the heat helps the conversion to biodiesel go faster. |
 |
TEMPERATURE: Using
a thermometer bring the temperature to between 120 to 130°F which
is about 50°C. This will feel hot but not too hot to touch.
Instead of an electric heater, you could set the flask
in hot water. Your hot tap water is close to this temperature. |
| CREATION OF
METHOXIDE: Methoxide is made from
a mixture of methanol and lye (sodium hydroxide). It is the most dangerous
step of the process because methoxide is very corrosive. Notice the goggles
and the gloves in the picture. Below is the equipment for the next step.
It consists of a 250 mL polyethylene bottle, lye (Sodium hydroxide [NaOH]),
a 12 oz (354 mL) bottle of gas antifreeze (methanol), a balance that can
measure to one tenth of a gram, splash proof goggles, chemical resistant
gloves, a funnel, and a spatula (or small spoon). |
 |
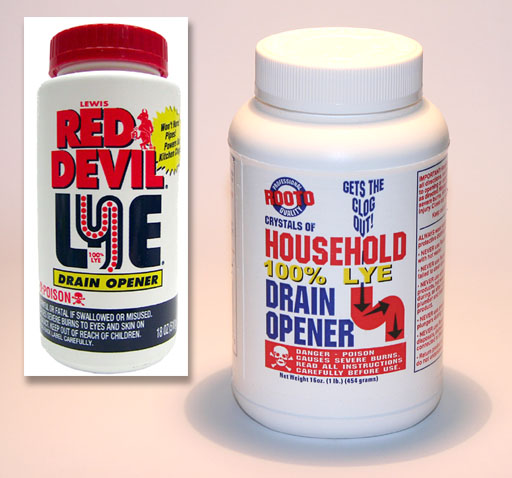 |
Some
Bottles of Lye Lie: When you buy lye (sodium hydroxide) you have
to be careful to get the pure form of the lye. Many types have other chemicals
in it. The bottles shown came from ACE Hardware. They did have pure lye.
The "lye" bottles at Home Depot and Walmart had additional ingredients.
So be sure to read the ingredients and only go with one that only lists
sodium hydroxide. |
 |
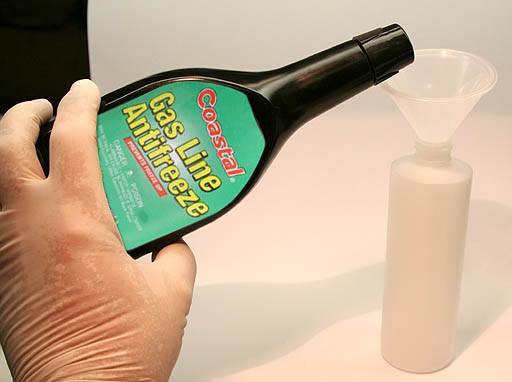
METHANOL (Methyl alcohol):
The methanol needs to be close to 100% methanol. If exposed to the air,
the methanol will absorb water, which will block the biodiesel conversion.
Pure methanol is sold as gas-line antifreeze because it
absorbs water in the gasoline and prevents the water from freezing. This
is not the cheapest source of methanol but is convenient for our small
scale production. Another source is racing fuel methanol, which is much
cheaper per gallon. Don't get the "ISO DRY"; that is isopropyl alcohol and won't work. |
 |
SPLASH RESISTANT GOGGLES:
These goggles fit snug to the face, which prevents liquid from getting
to the eyes. These goggles also have special vents that let air in but
keep liquids out.
Be sure to wear these as you make up the methoxide. |
| |
 |
SET UP FOR WEIGHING:
Here is the setup again. The procedure is to place five grams of sodium
hydroxide (lye) in the funnel and then add about half the contents of
the methanol (washes the lye into the bottle).
When the empty bottle and funnel are setting on the balance,
the display will read a certain mass. You could calculate what 5 addition
grams will make it weigh or press the "on/off zero" button (lower
right) and that will set the display to zero. Then you just need to add
enough lye to make the balance read 5.0 grams.
Literature says to add 3.5 grams of lye for every liter.
Since we have 1.4 liters, that makes it 5.0 grams. |
 |
WEIGH OUT LYE:
Open the lye bottle and using a spatula or small
spoon, add sodium hydroxide until the balance reads between 4.8 and 5.2
grams, with 5.0 grams being ideal. If some spills on the balance, brush
it off but be sure to wipe it up later. This is where having the balance
sit on a sheet of newpaper would be handy. Any spills could be caught
on the newpaper and disposed of more easily.
Be sure to close the bottle of lye as soon as you get
the right amount weighed. Lye will absorb water out of the air making
it heavier and less effective.
Be sure to be wearing goggles and gloves. |
 |
WEIGH OUT LYE (using bigger bottle):
Lately, instead of the smaller (250mL) bottle,
I've been using a half liter plastic (HDPE) bottle, which had been a bottle
that rubbing alcohol had come in. The larger bottle will allow you to
pour the whole methanol bottle into it.
Again, be sure to wear goggles. |
 |
Pour methanol into NaOH: At
this point 5 grams of lye (NaOH) will be in the funnel and bottle. Take
the bottle off the balance. Open the methanol (gas antifreeze) bottle
and pour some into the funnel. This will rinse the granules of lye down
into the bottle. Continue adding methanol until the white bottle is about
3/4 full. Put the cap on the white polyethylene bottle and the methanol
bottle. (Again, we're always trying to keep moisture in the air from being
absorbed.) (If you are using the larger white plastic
bottle, you can pour in the whole methanol bottle.) |
 |
Dissolve NaOH
in the methanol: Close the lid. Be sure
to be wearing goggles and gloves. Tip bottle
back and forth until the NaOH
dissolves. This might take about five minutes. The NaOH
reacts with the methanol (CH3OH)
to form a powerful substance called
methoxide CH3ONa.
The bottle will get warm as the NaOH (lye) dissolves. |
|
Check temperature:
Check to see if the temperature of the cooking oil is between 120 to 130°
Fahrenheit (50°C). |
 |
Place Flask
on Magnetic Stirrer: The flask can now be
placed on the magnetic stirrer. Be sure to put the magnetic bar (also called
magnetic flea) in the flask. To keep the temperature between 120 and 130°F
shine a spotlight or heat lamp on the mixture. Later, if the temperature
goes too high, move the light farther away. |
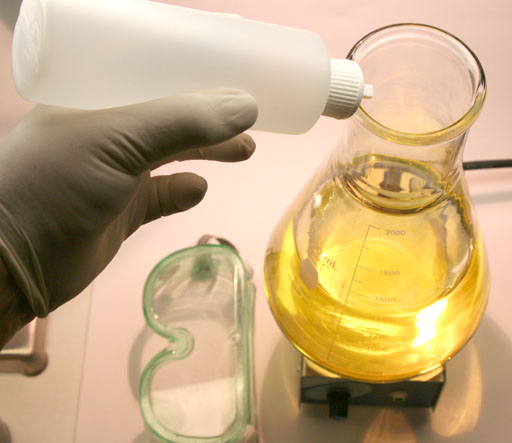 |
Pour Methoxide
into the oil: Open the flip-top and squirt it
into the oil. (If using the larger bottle, it won't have a flip-top). Again
be sure to be wearing goggles and gloves. |
 |
Add remaining methanol:
If you used the smaller white plastic bottle, the gas-line antifreeze
bottle (methanol) still has methanol in it. Pour the remaining methanol
into the flask containg the oil and methoxide. This extra methanol helps
to convert more of the oil to biodiesel.
|
 |
STIR MIXTURE: Turn
on the magnetic stirrer to mix the methoxide, methanol, and oil. If you
turn up the stirrer too fast, the magnet bar may get unstable and jump
around without stirring. So adjust the speed to get good stirring but
slow enough to keep the bar from jumping instead of spinning.
Stirring time is normally listed as 2
hours. Some biodiesel will be produced in minutes, but to get maximum
biodiesel, 2 hours is recommended.
Keep eye on temperature and adjust the distance of the
spotlight (or heat lamp) to keep temperature near the 120-130 degree Fahrenheit
range. |
 |
SEPARATORY FUNNEL:
The pear-shaped glassware is called a separatory funnel because it is
good for separating liquids that split into two layers. The stopcock at
the bottom of the separatory funnel makes it easy to drain off the lower
liquid.
In the biodiesel process the methoxide reacts with the
oil and makes two products. One is glycerin and the other is biodiesel.
The glycerin will sink to the bottom. A separatory funnel makes it easier
to drain off the glycerin. |
 |
Pour Product into Separatory Funnel:
Use a standard funnel to help get the mixture into the large separatory
funnel. We first didn't use a separatory funnel because of its cost. Without
it, getting the glycerin separated from the biodiesel required siphoning
or pouring off the biodiesel, which was sloppy and wasteful.
The separatory funnel will allow the glycerin to be easily
drained out. Later when we add water, it will be easy to drain off the
water.
We found a much cheaper vendor of the separatory funnel,
so we now highly recommend it for doing the process. (See equipment list
at bottom of page for vendor). |
 |
LET glycerin SETTLE:
In a few minutes the glycerin (also called glycerol) will begin to settle
to the bottom of the separatory funnel. If there is no layer it means
that the reaction did not take place. To the left the image of the glycerin
layer is hard to see, but it should be obvious.
It will not be pure glycerin, because some of the sodium
hydroxide (NaOH/Lye) will be with it. There will also be some methanol
in it. |
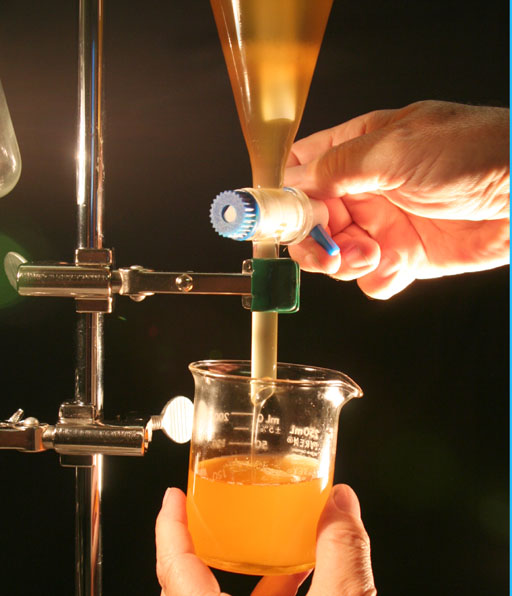 |
DRAIN OFF glycerin:
Turn the stopcock so the glycerin drains out. glycerin
can be saved to be used for other purposes. It is used in hand lotion
and as leather cleaner. This glycerin has some contamination with NaOH
and methanol, but the NaOH can be neutralized and the methanol will evaporate.
If you test it with pH paper you will find that it is
alkaline (basic) with a pH around 10.
The NaOH can be neutralized with a little lemon juice
to get it around a pH of 6 or 7. |
 |
DRAIN OFF glycerin(2):
Here is another photo of the glycerin being drained off
from the biodiesel. If the biodiesel is made from animal fat like lard,
the biodiesel will be clear, but the glycerin will still be a dark gold
color.
When used oil is used, the glycerin will carry much of
the burnt particles of food (particles too small to be captured by the
filter) and will be black in color.
The biodiesel (top layer) will have some glycerin, methanol, and
sodium hydroxide (lye) residue. After most of the glycerin separates,
we will proceed by adding water to the biodiesel to wash it. |
 |
RECOVER METHANOL:
If you want to recover methanol, that can be done by distillation. One reason to do it is that it lets you recover and reuse some of the expensive methanol. The other reason is that it keeps toxic methanol from getting into the wash water.
Biodiesel is heated in a flask that's in a water bath. The water is brought up to just below boiling. Methanol will evaporate and condense in the center tube (condenser). It will collect in the left flask.
The glycerin layer will also have some methanol in it. So distillation of the glycerin can recover some additional methanol. (more details will be added later) |
 |
This is where people either choose water washing, Magnesol dry wash, or a combination of the two. Water washing is shown below. Magnesol works best if the methanol is distilled from the biodiesel first. (More information on Magnesol washing will be added later). |
 |
ADD WATER FOR WASHING:
Now pour in tap water. About half a liter is good. The exact amount is
not critical.
Distilled water is not as good as tap water. The water
needs some dissolved salts in order to better separate from the biodiesel.
Again, we are trying to get rid of any residue of glycerin
and sodium hydroxide. Both of these can be harmful in an engine.
|
 |
USE AIR PUMP TO MIX WATER AND BIODIESEL:
The water will sink to the bottom. To stir it we use an aquarium air pump(bottom
of photo) to pump air through plastic tubing into the separatory funnel.
The air will bubble through the mixture and effectively stir it. The end
of the tubing has a weight on it to help it sink down to the bottom for
better stirring.
After about 3 minutes turn off the air pump. Hopefully
the water and biodiesel will separate. |
 |
WHAT TO DO IF EMULSION FORMS:
Once in awhile the water and biodiesel will form an emulsion and not separate.
The emulsion can last for days. To break up the emulsion, we add table
salt to the mixture. About a half teaspoon is enough. Add the salt and
mix it again by turning on the air pump for a few minutes. Turn on the
air pump and let is sit. Usually the mixture will start separating in
a few minutes.
When the oil is getting converted to biodiesel by the
methanol/lye mixture, some of the oil is getting converted to soap by
the lye. The soap will tie the water and biodiesel layers together to
make an emulsion. The salt you add will interfere with the soap (like
hard water does) and break up the emulsion.
|
 |
ALLOW WATER TO SEPARATE:
After the aquarium air pump mixes the mixture for about 3 minutes, you
can turn off the pump and let the water and biodiesel separate.
By the way, the small flask in the upper left is the glycerin.
|
 |
DRAIN OFF WASH WATER:
Drain off the water that was used to wash the biodiesel. If you check
the water with pH paper, you will find that it is very alkaline (pH of
12 or higher). That means the water has extracted some of the lye (sodium
hydroxide) from the biodiesel, which is good.
Add some more water and wash the biodiesel a second time.
The second wash water will be a lower pH (around 10). The third wash is usually fairly neutral (pH around 7) meaning
that most all of the lye has been washed away from the biodiesel. |
 |
DRY THE BIODIESEL:
After the wash water has been drained away, the biodiesel has traces of
water in it. That water needs to be removed before the biodiesel can be
used in an engine.
If you are not in a hurry, air can be bubbled through
the biodiesel (use the aquarium pump) for a couple of days. However, for
our demonstrations, we let the biodiesel drip quickly through some folded
paper towels (in the funnel) and then through a column (tube) containing cotton balls and
Drierite as a backup to the paper. The Drierite will turn from blue to
pink as it absorbs water. If Drierite at the bottom of the column turns
pink, then biodiesel still has some water in it and should be filtered
twice.
What we see in the large flask is the final "liquid
gold"; the biodiesel ready to be used in a diesel engine. |
 |
USE YOUR BIODIESEL:
This is the truck of one of the students who took our biodiesel class. You
can see why he is interested in making his own diesel fuel. His truck holds
about 100 gallons of fuel. |
 |
LIQUID GOLD BEING USED:
Jerry is adding the biodiesel we made during the class to the truck.
Yes, our half gallon would not go far in this big rig,
but it proves people can make their own diesel fuel. The owner of the
truck went on to buy a large scale production system. |
 |
WHEN READY, SCALE UP TO LARGE SCALE
PRODUCTION:
The student who owned the truck above bought this system
to make large batches of biodiesel. It's a nice setup, and everything
learned in the small scale production taught above applies to large scale
production. There are some other issues when dealing with large scale
production, but the main procedure is the same. |
 |
THE PROMISE OF BIODIESEL:
Yes, you can make your own biodiesel for your car, but
we recommend that you start with small scale production like shown in
this tutorial. We think you should use real chemistry labware to make
the process more efficient, safer, and more visible.
If you have any questions, you can contact me, Ken Costello,
at costello@chemistryland.com.
Later, I will cover how to do this process with used oil
and how to recover excess methanol. For those interested, I will show
more of the chemistry. I also may assemble extra kits and make them available
for purchasing. |
| Below is an equipment list for the items mentioned above. What I don't show yet is the distillation equipment. |
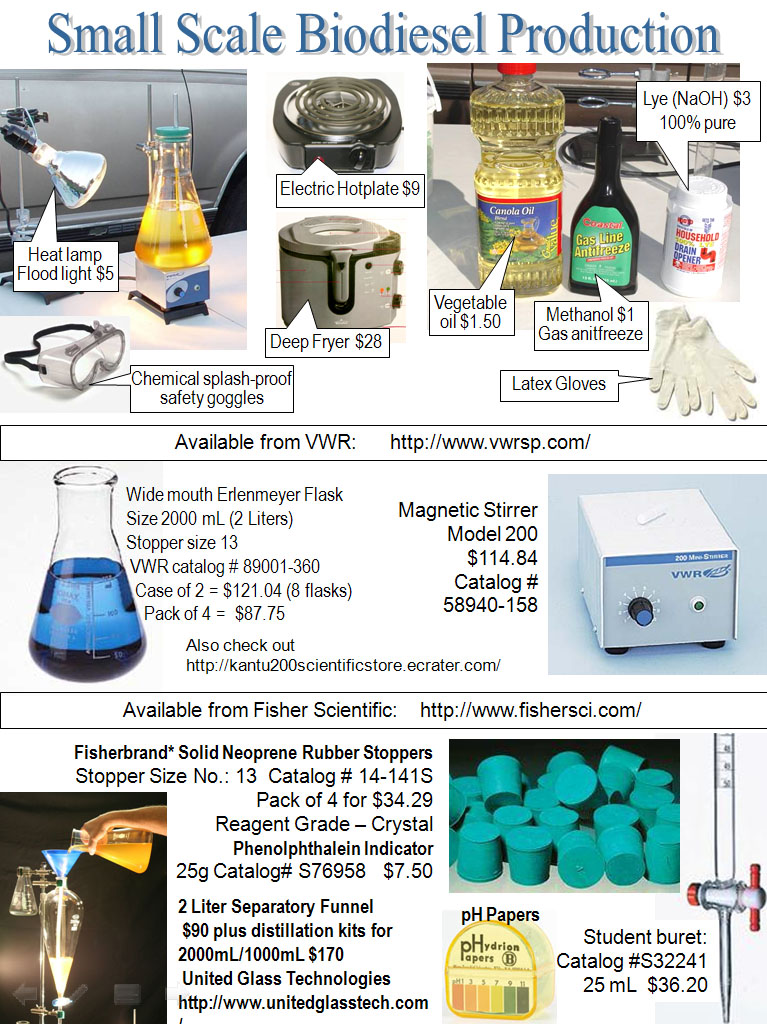 |


